写在前面
终于又捡起来FLTK了, 先来看看怎么通过FLUID创建一个图形界面并完成回调函数的创建, 参考的是官方教程中关于创建一个CubeView程序的例子, 教程里面很多都与最新版本的FLTK界面不太一致, 但是通过我的摸索还是找出了方法. 下面来分享一下.
创建类
直接点New新建各种类型即可, 一些注意事项在官方文档中给出了, 一些类或者组件的名称都用粗体标出来了(如下图), 需要对应, 不然后面回调函数连接不上.
在CubeViewUI类中主要实现了构造函数以及一个show方法, 用于显示窗体.
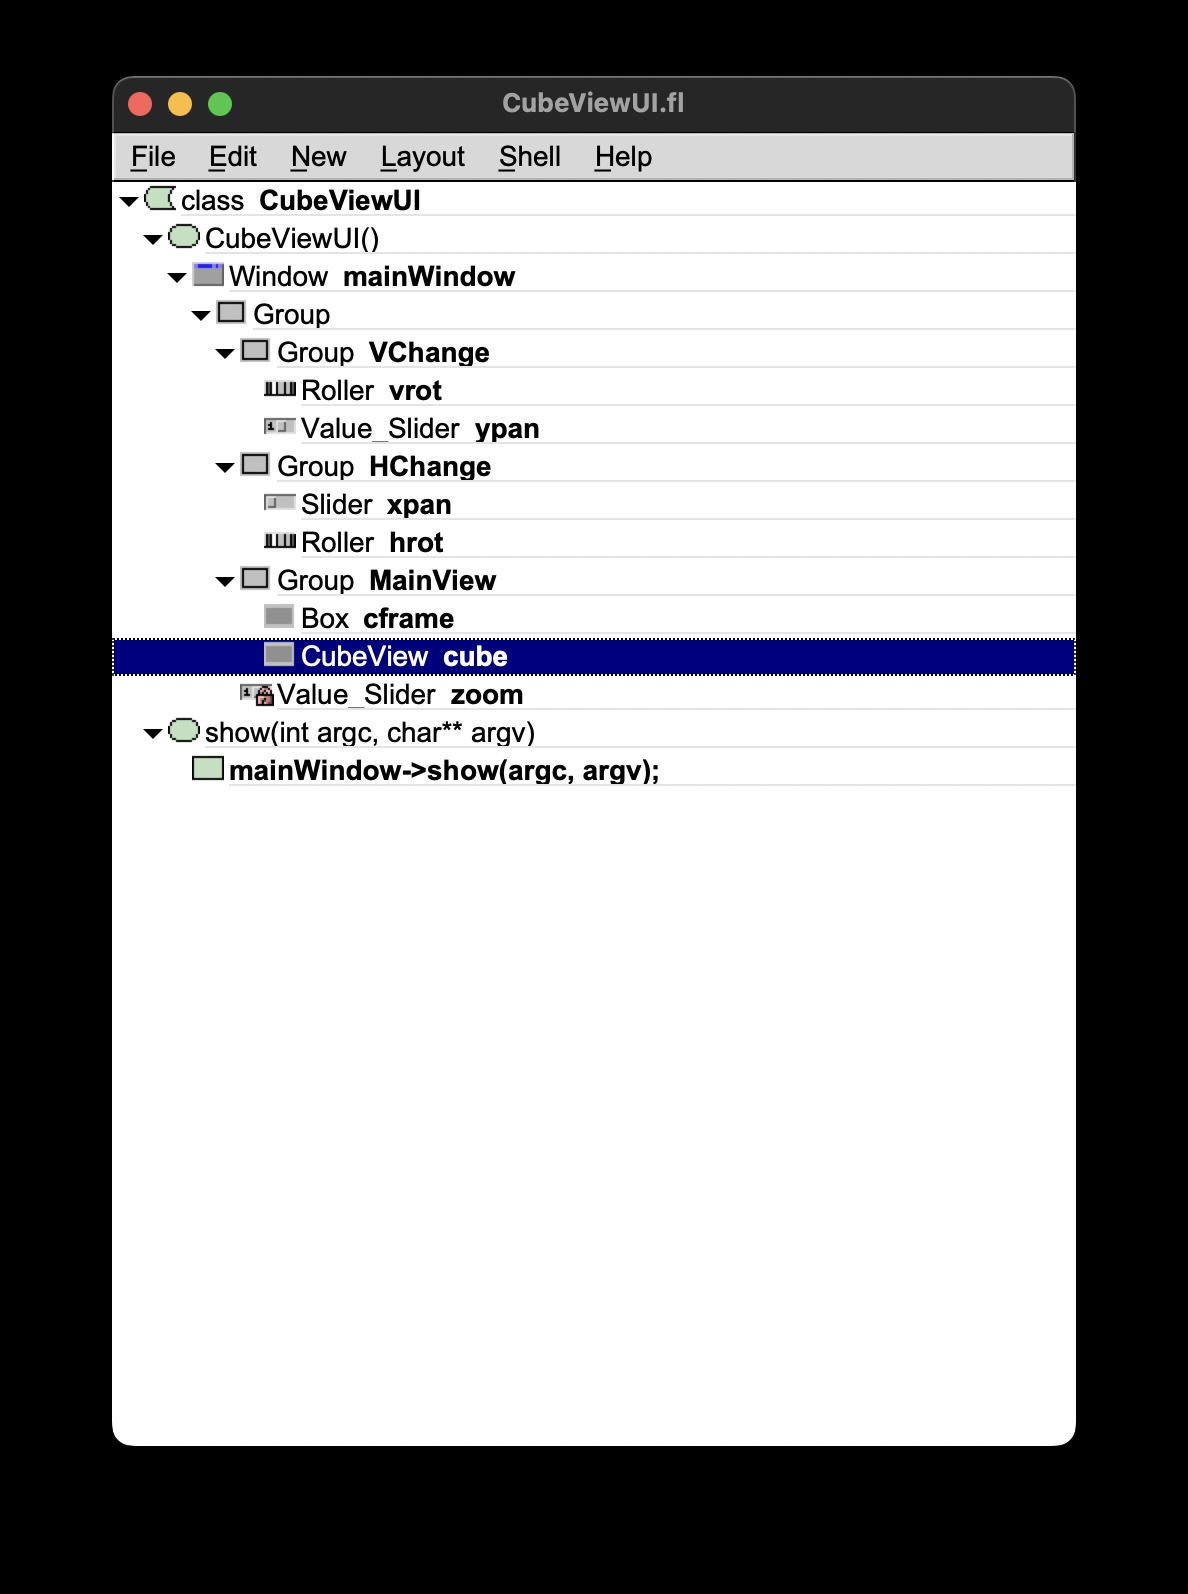
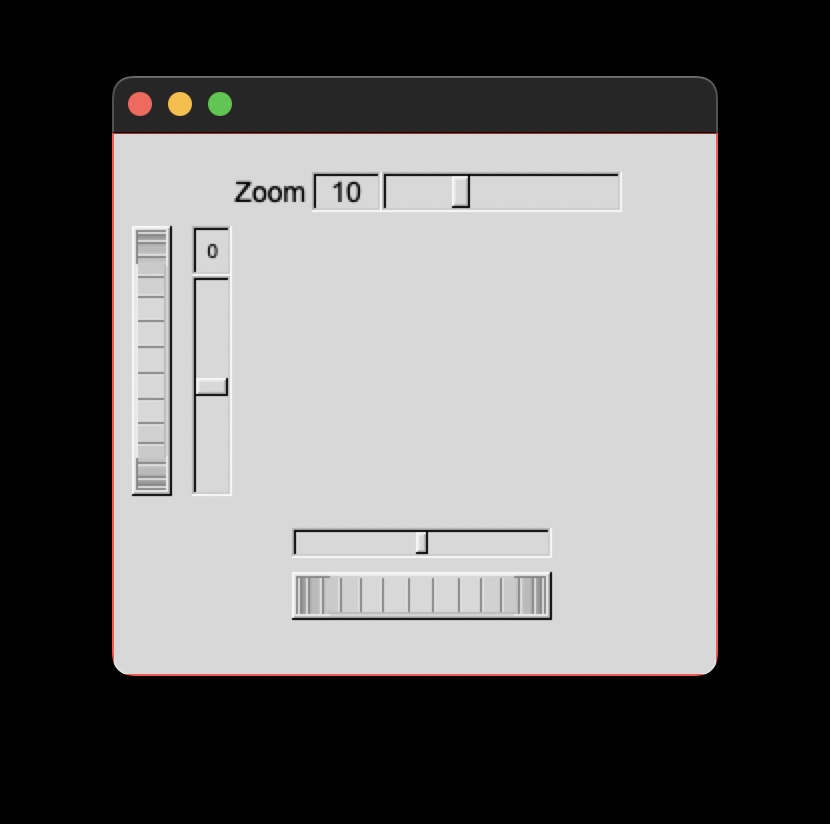
最后的结果如下, 这里其实主要是要看清楚是水平组件还是垂直组件, 这个很重要, 其次就是主窗体的大小, 配比要合适.
回调函数
其实就是两行, 主要用于五个主要组件中, 分为两组:
slider
- Zoom:
cube->size=((Fl_Value_Slider *)o)->value(); cube->redraw(); - ypan:
cube->pany(((Fl_Value_Slider *)o)->value()); cube->redraw(); -
xpan:
cube->panx(((Fl_Value_Slider *)o)->value());
cube->redraw();
roller
- vrot:
cube->v_angle(((Fl_Roller *)o)->value()); cube->redraw(); - hrot
cube->h_angle(((Fl_Roller *)o)->value());
cube->redraw();
CubeView类(显示图形)
最后是主要的显示窗体的类, 这需要在extra Code部分添加头文件声明:
#include "CubeView.h"
这部分代码如下:
// CubeView.h
#include <FL/gl.h>
#include <FL/Fl_Gl_Window.H>
#include <math.h>

class CubeView : public Fl_Gl_Window {
public:
    CubeView(int x, int y, int w, int h, const char *l = 0);
    // this value determines the scaling factor used to draw the cube.
    double size;
    /* Set the rotation about the vertical (y ) axis.
     *
     * This function is called by the horizontal roller in CubeViewUI
     * and the initialize button in CubeViewUI.
     */
    void v_angle(float angle) { vAng = angle; };
    // Return the rotation about the vertical (y ) axis.
    float v_angle() { return vAng; };
    /* Set the rotation about the horizontal (x ) axis.
     *
     * This function is called by the vertical roller in CubeViewUI
       and the
     * initialize button in CubeViewUI.
     */
    void h_angle(float angle) { hAng = angle; };
    // the rotation about the horizontal (x ) axis.
    float h_angle() { return hAng; };
    /* Sets the x shift of the cube view camera.
     *
     * This function is called by the slider in CubeViewUI and the
     * initialize button in CubeViewUI.
     */
    void panx(float x) { xshift = x; };
    /* Sets the y shift of the cube view camera.
     *
     * This function is called by the slider in CubeViewUI and the
     * initialize button in CubeViewUI.
     */
    void pany(float y) { yshift = y; };
    /* The widget class draw() override.
     * The draw() function initialize Gl for another round of
     * drawing then calls specialized functions for drawing each
     * of the entities displayed in the cube view.
     */
    void draw();

private:
    /* Draw the cube boundaries
     * Draw the faces of the cube using the boxv[] vertices, using
     * GL_LINE_LOOP for the faces. The color is #defined by
     * CUBECOLOR.
     */
    void drawCube();
    float vAng, hAng;
    float xshift, yshift;
    float boxv0[3];
    float boxv1[3];
    float boxv2[3];
    float boxv3[3];
    float boxv4[3];
    float boxv5[3];
    float boxv6[3];
    float boxv7[3];
};
// CubeView.cxx
#include "CubeView.h"

CubeView::CubeView(int x, int y, int w, int h, const char *l)
    : Fl_Gl_Window(x, y, w, h, l) {
    vAng = 0.0;
    hAng = 0.0;
    size = 10.0;
    /* The cube definition. These are the vertices of a unit cube
     * centered on the origin.*/
    boxv0[0] = -0.5;
    boxv0[1] = -0.5;
    boxv0[2] = -0.5;
    boxv1[0] = 0.5;
    boxv1[1] = -0.5;
    boxv1[2] = -0.5;
    boxv2[0] = 0.5;
    boxv2[1] = 0.5;
    boxv2[2] = -0.5;
    boxv3[0] = -0.5;
    boxv3[1] = 0.5;
    boxv3[2] = -0.5;
    boxv4[0] = -0.5;
    boxv4[1] = -0.5;
    boxv4[2] = 0.5;
    boxv5[0] = 0.5;
    boxv5[1] = -0.5;
    boxv5[2] = 0.5;
    boxv6[0] = 0.5;
    boxv6[1] = 0.5;
    boxv6[2] = 0.5;
    boxv7[0] = -0.5;
    boxv7[1] = 0.5;
    boxv7[2] = 0.5;
};
// The color used for the edges of the bounding cube.
#define CUBECOLOR 255, 255, 255, 255
void CubeView::drawCube() {
    /* Draw a colored cube */
#define ALPHA 0.5
    glShadeModel(GL_FLAT);
    glBegin(GL_QUADS);
    glColor4f(0.0, 0.0, 1.0, ALPHA);
    glVertex3fv(boxv0);
    glVertex3fv(boxv1);
    glVertex3fv(boxv2);
    glVertex3fv(boxv3);
    glColor4f(1.0, 1.0, 0.0, ALPHA);
    glVertex3fv(boxv0);
    glVertex3fv(boxv4);
    glVertex3fv(boxv5);
    glVertex3fv(boxv1);
    glColor4f(0.0, 1.0, 1.0, ALPHA);
    glVertex3fv(boxv2);
    glVertex3fv(boxv6);
    glVertex3fv(boxv7);
    glVertex3fv(boxv3);
    glColor4f(1.0, 0.0, 0.0, ALPHA);
    glVertex3fv(boxv4);
    glVertex3fv(boxv5);
    glVertex3fv(boxv6);
    glVertex3fv(boxv7);
    glColor4f(1.0, 0.0, 1.0, ALPHA);
    glVertex3fv(boxv0);
    glVertex3fv(boxv3);
    glVertex3fv(boxv7);
    glVertex3fv(boxv4);
    glColor4f(0.0, 1.0, 0.0, ALPHA);
    glVertex3fv(boxv1);
    glVertex3fv(boxv5);
    glVertex3fv(boxv6);
    glVertex3fv(boxv2);
    glEnd();
    glColor3f(1.0, 1.0, 1.0);
    glBegin(GL_LINES);
    glVertex3fv(boxv0);
    glVertex3fv(boxv1);
    glVertex3fv(boxv1);
    glVertex3fv(boxv2);
    glVertex3fv(boxv2);
    glVertex3fv(boxv3);
    glVertex3fv(boxv3);
    glVertex3fv(boxv0);
    glVertex3fv(boxv4);
    glVertex3fv(boxv5);
    glVertex3fv(boxv5);
    glVertex3fv(boxv6);
    glVertex3fv(boxv6);
    glVertex3fv(boxv7);
    glVertex3fv(boxv7);
    glVertex3fv(boxv4);
    glVertex3fv(boxv0);
    glVertex3fv(boxv4);
    glVertex3fv(boxv1);
    glVertex3fv(boxv5);
    glVertex3fv(boxv2);
    glVertex3fv(boxv6);
    glVertex3fv(boxv3);
    glVertex3fv(boxv7);
    glEnd();
}; // drawCube
void CubeView::draw() {
    if (!valid()) {
        glLoadIdentity();
        glViewport(0, 0, w(), h());
        glOrtho(-10, 10, -10, 10, -20000, 10000);
        glEnable(GL_BLEND);
        glBlendFunc(GL_SRC_ALPHA, GL_ONE_MINUS_SRC_ALPHA);
    }
    glClear(GL_COLOR_BUFFER_BIT | GL_DEPTH_BUFFER_BIT);
    glPushMatrix();
    glTranslatef(xshift, yshift, 0);
    glRotatef(hAng, 0, 1, 0);
    glRotatef(vAng, 1, 0, 0);
    glScalef(float(size), float(size), float(size));
    drawCube();
    glPopMatrix();
};
主文件(main)
#include "CubeViewUI.h"

static int my_handler(int event) {
    if (event == FL_SHORTCUT) return 1;
    // eat all shortcut keys
    return 0;
}

int main(int argc, char **argv) {
    CubeViewUI ui;
    Fl::add_handler(my_handler);
    ui.show(argc, argv);
    return Fl::run();
}
这里我加上了句柄函数, 这个函数用来使esc键失效, 否则在窗体中按下esc会直接关闭窗口.
编译链接
重点要说一下编译链接这块.
官方Makefile
先给出官方文档1中的Makefile, 其实用Cmake要方便一些, 但是Makefile也要会写才行.
CXX      = $(shell fltk-config --cxx)
DEBUG    = -g
CXXFLAGS = $(shell fltk-config --use-gl --use-images --cxxflags ) -I.
LDFLAGS  = $(shell fltk-config --use-gl --use-images --ldflags )
LDSTATIC = $(shell fltk-config --use-gl --use-images --ldstaticflags )
LINK     = $(CXX)

TARGET = cube
OBJS =  CubeMain.o CubeView.o CubeViewUI.o
SRCS =  CubeView.cxx CubeViewUI.cxx

.SUFFIXES: .o .cxx
%.o: %.cxx
	$(CXX) $(CXXFLAGS) $(DEBUG) -c $<

all: $(TARGET)
	$(LINK) -o $(TARGET) $(OBJS) $(LDSTATIC)

$(TARGET): $(OBJS)
CubeMain.o: CubeMain.cxx CubeViewUI.h
CubeView.o: CubeView.cxx CubeView.h CubeViewUI.h
CubeViewUI.o: CubeViewUI.cxx CubeView.h

clean: $(TARGET) $(OBJS)
	rm -f *.o 2> /dev/null
	rm -f $(TARGET) 2> /dev/null
CmakeLists
再给出Cmake文件(之前其实就介绍过)
cmake_minimum_required(VERSION 3.24)
project(fltk_proj)

set(CMAKE_CXX_STANDARD 17)

FIND_PACKAGE(FLTK REQUIRED)

# 相当于gcc `-I`参数
include_directories("/opt/homebrew/include")
# 相当于gcc `-L`参数
link_directories("/opt/homebrew/lib")

# 相当于gcc `-l`参数
link_libraries("fltk")
link_libraries("Xext")
link_libraries("X11")
link_libraries("m")

# 添加可执行程序
add_executable(test1 CubeMain.cxx CubeViewUI.cxx CubeView.cxx)

# MESSAGE(${FLTK_LIBRARIES})
TARGET_LINK_LIBRARIES(test1 ${FLTK_LIBRARIES})
最后如果想生成MacOS下的test.app目录, 那么只需要在命令行中输入:
fltk-config --post <前面生成的可执行文件名>
就会在同级目录下生成xxx.app了, 还是相当方便的.
部署.app目录的Shell脚本
后来我发现这个步骤可以通过Shell脚本来完成(fltk-config本质是就是一个可执行的脚本文件)
具体参考了fltk-config源码, 以及2. 脚本如下:
#!/bin/sh

compile=$1
case "$compile" in
*.cxx)
	prog=$(basename "$compile" .cxx)
	;;
*.cpp)
	prog=$(basename "$compile" .cpp)
	;;
*.cc)
	prog=$(basename "$compile" .cc)
	;;
*.C)
	prog=$(basename "$compile" .C)
	;;
*)
	echo "ERROR: Unknown/bad C++ soure file extension on \"$compile\"!"
	exit 1
	;;
esac

post=$prog
echo Creating "$post.app" bundle for desktop...

id=$(echo $post | tr ' ' '_')
echo $id

# Make the bundle directory and move the executable there
rm -rf "$post.app/Contents/MacOS"
mkdir -p "$post.app/Contents/MacOS"
mv "$post" "$post.app/Contents/MacOS"

# Make a shell script that runs the bundled executable
echo "#!/bin/sh" >"$post"
echo 'dir="`dirname \"$0\"`"' >>"$post"
echo 'exec "$dir/'"$post.app/Contents/MacOS/$post"'" "$@"' >>"$post"
chmod +x "$post"

# Make the simplest Info.plist needed for an application
cat >"$post.app/Contents/Info.plist" <<EOF
<?xml version="1.0" encoding="UTF-8"?>
<plist version="0.9">
    <dict>
    <key>CFBundleInfoDictionaryVersion</key>
    <string>6.0</string>
    <key>CFBundleExecutable</key>
    <string>$post</string>
    <key>CFBundleIdentifier</key>
    <string>org.fltk.$id</string>
    <key>CFBundleName</key>
    <string>$post</string>
    <key>CFBundlePackageType</key>
    <string>APPL</string>
    <key>NSHighResolutionCapable</key>
    <true/>
    </dict>
</plist>
EOF

echo "done!"
用法为:(保存为gen_app.sh)
./gen_app.sh test.cpp
终极版Makefile(集合编译链接与部署)
但是不够简洁, 于是想着把Shell集成在Makefile里面, 于是就有: (部分较官方文档有改动)
CXX      = $(shell fltk-config --cxx)
DEBUG    = -g
CXXFLAGS = $(shell fltk-config --use-gl --use-images --cxxflags ) -I.
LDFLAGS  = $(shell fltk-config --use-gl --use-images --ldflags )
LDSTATIC = $(shell fltk-config --use-gl --use-images --ldstaticflags )
LINK     = $(CXX)

TARGET = cube
OBJS =  CubeMain.o CubeView.o CubeViewUI.o
SRCS =  CubeMain.cxx CubeView.cxx CubeViewUI.cxx

APP_NAME= $(TARGET)

define info_plist
<?xml version="1.0" encoding="UTF-8"?> \
<plist version="0.9"> \
	<dict> \
	<key>CFBundleInfoDictionaryVersion</key> \
	<string>6.0</string> \
	<key>CFBundleExecutable</key> \
	<string>APP_NAME</string> \
	<key>CFBundleIdentifier</key> \
	<string>org.fltk.APP_NAME</string> \
	<key>CFBundleName</key> \
	<string>APP_NAME</string> \
	<key>CFBundlePackageType</key> \
	<string>APPL</string> \
	<key>NSHighResolutionCapable</key> \
	<true/> \
	</dict> \
</plist>
endef

.SUFFIXES: .o .cxx
compile: $(SRCS)
	@echo "compiling..."
	@$(CXX) $(CXXFLAGS) $(DEBUG) -c $^

all: compile link run

bundle_app: clean_app package_app

run: compile link $(TARGET)
	./$(TARGET)

package_app: compile link
	@echo "bundling..."
	@mkdir -p $(APP_NAME).app/Contents/{MacOS,Resources}
	@echo '$(info_plist)' > "$(APP_NAME).app/Contents/Info.plist"
	@sed -e "s/APP_NAME/$(APP_NAME)/g" -i "" "$(APP_NAME).app/Contents/Info.plist"
	@cp $(TARGET) "$(APP_NAME).app/Contents/MacOS/$(APP_NAME)"
#	cp -R "$(FRAMEWORK_PATH)/SDL2.framework" "$(APP_NAME).app/Contents/Resources/"

link: $(OBJS)
	@echo "linking..."
	@$(LINK) -o $(TARGET) $(OBJS) $(LDSTATIC)

clean: clean_app
	@echo "Delete *.o $(TARGET)..."
	@rm -f *.o 2> /dev/null
	@rm -f $(TARGET) 2> /dev/null

clean_app:
	@echo "Delete $(APP_NAME).app..."
	@rm -rf $(APP_NAME).app
用这套Makefile, 配合clion, 简直无敌!
效果
几点注意
- Makefile缩进需要用制表符, 如果要用空格需要在开头加上
.RECIPEPREFIX := $(.RECIPEPREFIX)<space>, 其中<space>是一个空格. - FLUID界面也会被
esc关闭, 注意保存, 可以通过快捷键⌘+S保存, 然后⌘+⇧+C生成头文件和源码. - 控件通过拖放完成布局, 需要调整部分控件的范围与
step, 例如roller和slider. - 布局应该和回调函数分离, 便于维护, 后续会写相关文章.